Webflow is already a powerful platform for building visually sophisticated, CMS-driven websites. But when you connect it to modern AI tools — OpenAI's GPT-4, Anthropic's Claude, or orchestration layers like n8n — you move from a static publishing workflow into something genuinely intelligent: a system that generates, personalizes, and updates content at scale without manual intervention.
This is not about replacing your editorial team. It is about eliminating the bottlenecks that slow them down — bulk CMS population, SEO metadata generation, product description drafting, and content localization — and replacing those bottlenecks with automated pipelines that produce structured, brand-consistent output and push it directly into Webflow's CMS via API.
At werun.dev, we build exactly these kinds of integrations as part of our Webflow development and AI & automation services. What follows is a technical breakdown of how these architectures work, what tools are involved, and where the real complexity lives.
The Architecture: How Webflow and AI Actually Connect
Webflow exposes a REST API that allows you to read and write CMS collection items programmatically. That API is the bridge between your Webflow site and any external system — including AI pipelines. Understanding this architecture is essential before writing a single line of code or configuring a single workflow node.
Webflow CMS API: The Foundation
Every Webflow CMS collection has a unique Collection ID. Items within that collection have fields — rich text, plain text, images, references, switches — each with a field slug. The Webflow API allows you to:
GET /collections/{collection_id}/items— retrieve existing itemsPOST /collections/{collection_id}/items— create new itemsPATCH /collections/{collection_id}/items/{item_id}— update existing itemsPOST /collections/{collection_id}/items/publish— publish staged items
Authentication uses a Bearer token generated from a Webflow API application. For production pipelines, you should use OAuth 2.0 rather than a personal access token, especially if the integration is client-facing or multi-site.
Where AI Fits In
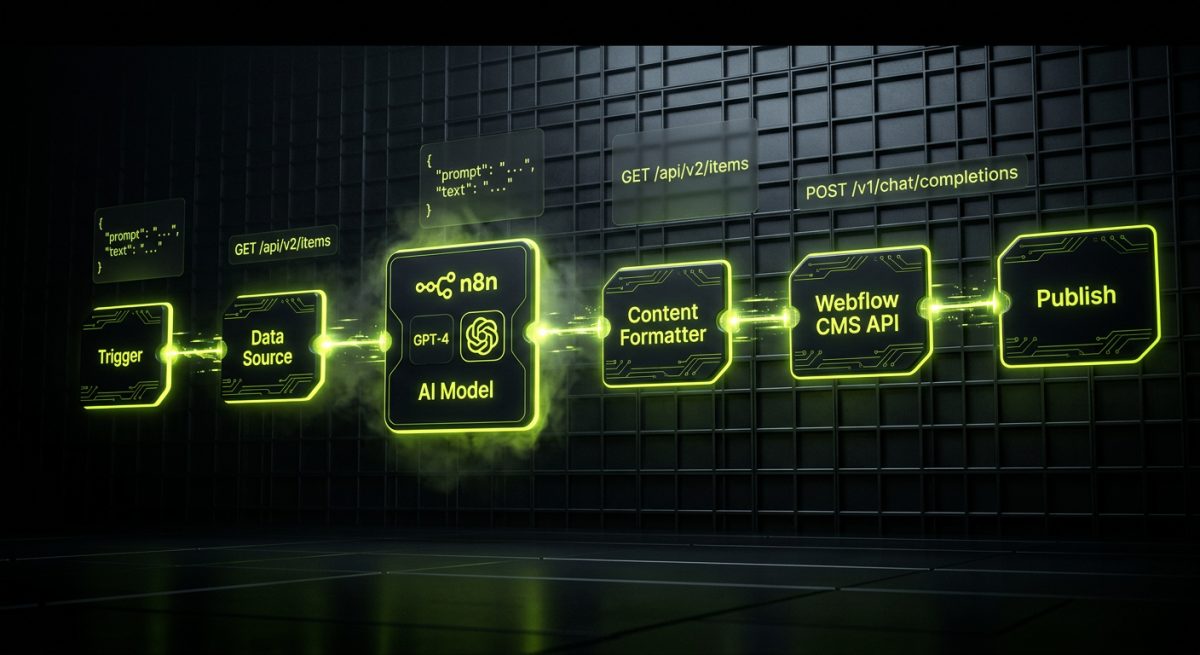
The AI component sits upstream of the Webflow API call. The pattern looks like this:
Trigger → Data Source → AI Model → Content Formatter → Webflow CMS API → Publish
- Trigger: a webhook, a cron schedule, a form submission, or a new row in Airtable
- Data Source: a product feed, a keyword list, a CSV, a database query, or a scraped page
- AI Model: GPT-4 or Claude generates structured content based on a prompt and the input data
- Content Formatter: the raw AI output is parsed, validated, and mapped to Webflow field slugs
- Webflow CMS API: the formatted payload is sent as a POST or PATCH request
- Publish: items are staged and then published, either immediately or on a schedule
This pipeline can be built with custom Node.js or Python scripts, but in most production scenarios we use n8n as the orchestration layer. n8n provides visual workflow management, built-in error handling, retry logic, execution logging, and native HTTP request nodes — which means you can build and maintain these pipelines without managing raw infrastructure.
A Concrete Example: Blog Post Generation from a Keyword List
Suppose a client maintains a Google Sheet with 200 target keywords for their blog. The goal is to generate a draft post for each keyword and populate it into Webflow as a staged CMS item.
The n8n workflow looks like this:
1. Schedule Trigger (daily at 06:00)
2. Google Sheets node → read rows where status = "pending"
3. Loop Over Items node
4. OpenAI node → send prompt with keyword, brand guidelines, tone instructions
5. Code node → parse AI response, extract title / body / meta description / slug
6. HTTP Request node → POST to Webflow CMS API
7. Google Sheets node → update row status to "drafted"
8. Slack node → send summary notification
The OpenAI prompt is structured to return JSON rather than free text, which eliminates the need for fragile string parsing:
{
  "prompt": "You are a content writer for [brand]. Write a blog post about: [keyword].\n\nReturn a JSON object with these keys: title (string), body (HTML string, 800-1200 words), meta_description (string, max 155 chars), slug (lowercase-hyphenated)."
}
By requesting structured JSON output and using GPT-4's response format enforcement (response_format: { type: 'json_object' }), you get reliable, parseable output that maps directly to Webflow field slugs without manual cleanup.
Prompt Engineering for CMS-Ready Content
The quality of AI-generated content in a Webflow CMS is entirely dependent on the quality of your prompts. Generic prompts produce generic content. The prompts that work in production are engineered with the same rigor as any other piece of software.
System Prompts and Brand Context
Every AI call in a content pipeline should include a system prompt that encodes brand voice, formatting rules, and structural requirements. This is not a one-time setup — it is a maintained artifact that evolves with the client's editorial standards.
A production system prompt for a B2B SaaS client might include:
- Tone directives: "Write in a direct, confident B2B tone. No filler phrases. No passive voice."
- Structural requirements: "Every post must include: one H2 with a how-to framing, one code block or numbered list, and a CTA paragraph at the end."
- SEO rules: "The primary keyword must appear in the first 100 words, in one H2, and in the meta description. Do not stuff."
- Forbidden patterns: "Never use phrases like 'In today's fast-paced world' or 'Let's dive in'."
- Output format: "Return valid JSON matching this schema: { title, body_html, meta_title, meta_description, slug, excerpt }"
Handling Rich Text Fields
Webflow's rich text fields accept HTML. This is both an opportunity and a source of bugs. AI models will produce valid HTML if prompted correctly, but you need to validate and sanitize that output before sending it to the API. In Node.js, libraries like sanitize-html or DOMPurify (server-side via jsdom) can strip disallowed tags and enforce your allowed element list.
A safe allowed-element list for Webflow rich text typically includes:
const allowedTags = [
  'p', 'h2', 'h3', 'h4', 'ul', 'ol', 'li',
  'strong', 'em', 'a', 'code', 'pre', 'blockquote'
];
Webflow does not support <div> wrappers inside rich text fields via the API — content that includes them will either fail silently or render incorrectly. This is a common source of bugs in AI-to-Webflow pipelines and one of the reasons having an experienced team manage the integration matters.
Dynamic Personalization vs. Bulk Generation
There are two distinct use cases that require different architectural approaches:
Bulk generation is an offline, scheduled process. You run it once (or on a cadence) to populate a large number of CMS items. Latency is not a concern. You can batch API calls, implement rate limiting, and run the pipeline during off-peak hours.
Dynamic personalization is a real-time process. A visitor lands on a page, and the content adapts based on their segment, location, referral source, or behavior. This requires a different stack — typically a Webflow site with custom JavaScript that calls a serverless function (Cloudflare Workers, Vercel Edge Functions, or AWS Lambda), which in turn calls the AI API and returns personalized content to be injected into the DOM.
For dynamic personalization in Webflow, the pattern looks like:
// Custom code embed in Webflow
async function loadPersonalizedHero() {
  const segment = getUserSegment(); // from cookie, URL param, or localStorage
  const response = await fetch('https://your-edge-function.workers.dev/personalize', {
    method: 'POST',
    headers: { 'Content-Type': 'application/json' },
    body: JSON.stringify({ segment, page: window.location.pathname })
  });
  const { headline, subheadline, cta } = await response.json();
  document.querySelector('[data-hero-headline]').textContent = headline;
  document.querySelector('[data-hero-sub]').textContent = subheadline;
  document.querySelector('[data-hero-cta]').textContent = cta;
}
loadPersonalizedHero();
This approach keeps AI logic off the client, protects API keys, and allows you to cache responses at the edge for segments you have already computed.
Building Maintainable AI-Webflow Pipelines in Production
Getting a proof-of-concept working is straightforward. Building a pipeline that runs reliably for months, handles API failures gracefully, respects rate limits, and produces consistent content quality — that is where the engineering work lives.
Rate Limits and Queueing
Both the Webflow CMS API and the OpenAI / Anthropic APIs have rate limits. Webflow's API enforces a limit of 60 requests per minute on the standard tier. OpenAI's limits vary by model and tier but are measured in requests per minute and tokens per minute.
In n8n, you handle this with a combination of:
- Wait nodes between loop iterations (e.g., 1-second delay per item)
- Error handling branches that catch 429 responses and retry with exponential backoff
- Batch size limits that process a fixed number of items per execution rather than the entire queue
In custom Node.js pipelines, libraries like p-limit and bottleneck provide programmatic concurrency control:
import Bottleneck from 'bottleneck';

const limiter = new Bottleneck({
  minTime: 1000, // minimum 1 second between requests
  maxConcurrent: 1
});

const createCMSItem = limiter.wrap(async (itemData) => {
  return await webflowClient.post(`/collections/${COLLECTION_ID}/items`, itemData);
});
Content Validation Before API Submission
AI models occasionally produce output that violates your schema — a missing field, an oversized string, an invalid slug format. Sending invalid data to the Webflow API results in a 400 error that silently drops the item from your queue if you are not handling it correctly.
Before every API call, validate the AI output against a schema. In JavaScript, Zod is the cleanest option:
import { z } from 'zod';

const CMSItemSchema = z.object({
  title: z.string().min(10).max(120),
  body_html: z.string().min(200),
  meta_description: z.string().max(155),
  slug: z.string().regex(/^[a-z0-9-]+$/),
  excerpt: z.string().max(300)
});

const validated = CMSItemSchema.safeParse(aiOutput);
if (!validated.success) {
  // log the error, flag the source row, skip the API call
  console.error('Validation failed:', validated.error.issues);
  return;
}
Monitoring, Alerting, and Content Auditing
A pipeline that runs unsupervised needs observability. In n8n, every execution is logged with input/output data, execution time, and error details. For production pipelines we configure:
- Slack alerts on any execution that contains an error node
- Weekly summary webhooks that report items created, items failed, and items flagged for review
- Airtable or Google Sheets audit logs that record every CMS item created, with the source data, the AI model used, the prompt version, and the timestamp
Prompt versioning is particularly important. When you update a system prompt — to improve quality, fix a recurring error, or adapt to new brand guidelines — you want to know which CMS items were generated with which prompt version. This allows you to re-run generation for older items when prompt quality improves significantly.
When to Use Webflow vs. When to Move to Next.js
Webflow's CMS has a hard limit of 10,000 items per collection. For most content sites, this is sufficient. But if your AI pipeline is generating content at scale — thousands of programmatic SEO pages, product descriptions for a large catalog, or localized content across multiple languages — you will hit that ceiling.
This is one of the scenarios where werun.dev's Webflow-to-Next.js migration service becomes relevant. We can preserve your Webflow design system and migrate the CMS layer to a headless architecture — using Webflow as the visual design tool while serving content from a database or a headless CMS with no item limits. The AI pipeline connects to the database directly, bypassing Webflow's API entirely, and the Next.js front-end renders the content with the same visual fidelity as the original Webflow build.
For teams that are not at that scale yet, Webflow's native CMS with an AI-powered population pipeline is a highly effective and maintainable architecture — and it can be extended to headless when the time comes without rebuilding from scratch.
Integrating AI Content Pipelines with Webflow's Broader Ecosystem
Content generation is rarely an isolated workflow. In most production environments, the AI-Webflow pipeline is one component in a larger system that includes CRM data, analytics events, e-commerce feeds, and editorial approval workflows. Building these integrations correctly requires understanding how Webflow's API interacts with the rest of your stack.
Connecting to Airtable as a Content Operations Hub
Airtable is a natural fit for managing AI-generated content at scale. It provides a structured database with views, filters, and automation triggers, and it integrates natively with n8n. A common architecture we build for clients uses Airtable as the content operations hub:
- Input table: keyword targets, product data, or topic briefs entered by the editorial team
- Output table: AI-generated drafts stored with status fields (pending review, approved, rejected, published)
- Approval workflow: editors review drafts in Airtable, mark them as approved, which triggers an n8n webhook
- Publish pipeline: n8n receives the webhook, retrieves the approved content from Airtable, and POSTs it to the Webflow CMS API
This architecture gives editorial teams full visibility and control without requiring them to touch the Webflow Designer or the API. It also creates a complete audit trail of every piece of content — who approved it, when it was published, and what the source data was.
HubSpot and Personalized Landing Pages
For B2B clients using HubSpot as their CRM, AI-powered personalization can extend to Webflow landing pages. The pattern works like this:
- A prospect clicks a link in a HubSpot email sequence. The link includes a contact token or UTM parameters that identify the contact's segment, industry, or lifecycle stage.
- A Webflow custom code embed reads the URL parameters on page load.
- A serverless function receives the parameters, queries HubSpot's API for contact properties, and sends a personalization request to GPT-4.
- The AI returns a personalized headline, value proposition, and CTA based on the contact's industry and stage.
- The custom code injects the personalized content into the page DOM.
This is not hypothetical — it is a pattern we implement as part of our Webflow API integrations and AI automation services. The result is a landing page that speaks directly to a CFO at a mid-market manufacturing company differently than it speaks to a marketing manager at a Series A SaaS startup, using the same Webflow template.
Multi-Language Content Generation with Weglot
For clients with international audiences, AI can dramatically reduce the cost and time of content localization. Instead of manually translating every CMS item, the pipeline generates content in the target language from the source data — or translates approved English content using a translation-optimized prompt.
Webflow's native multi-language support (currently in beta) and Weglot both work well with AI-generated translations. With Weglot, translated strings are stored in Weglot's database and served via their CDN — which means you can push AI-generated translations directly to Weglot's API without touching the Webflow CMS at all. With Webflow's native multi-language, you create separate CMS items per locale and populate them via the API using the same pipeline, with locale-specific prompts.
The key to quality in AI translation pipelines is not the translation step itself — modern LLMs translate well — but the terminology consistency layer. For technical or regulated industries, you should maintain a glossary of approved translations for key terms and inject that glossary into the system prompt. This prevents the AI from translating product names, technical terms, or brand-specific language inconsistently across items.